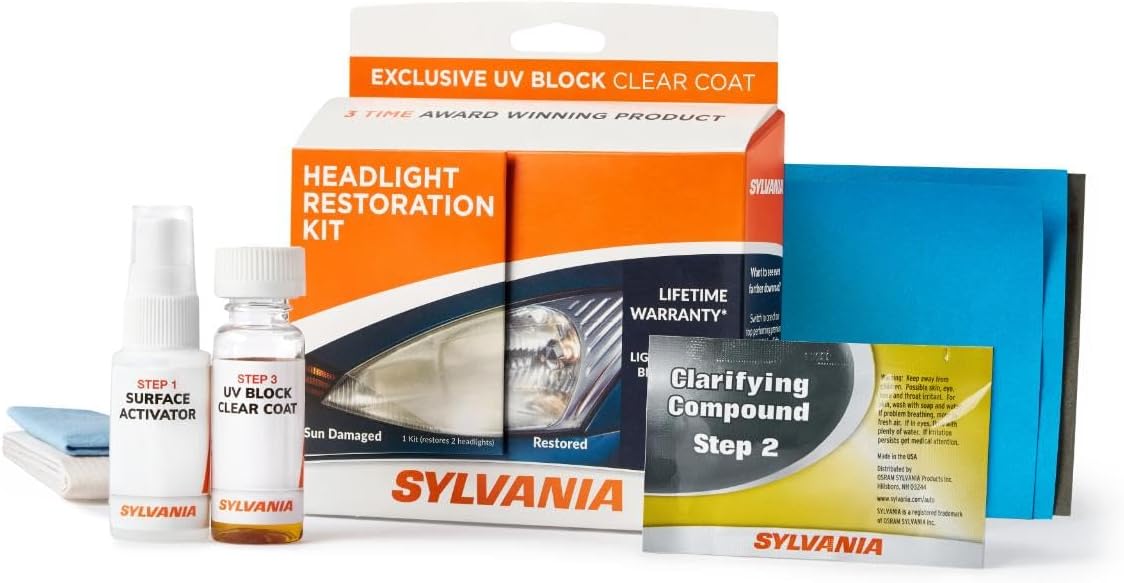
If your headlights have gone from clear to milky yellow, the good news is that you almost certainly don’t need new housings. The best headlight restoration kit for most people is the SYLVANIA Headlight Restoration Kit — it’s the only sub-$25 kit that pairs a real surface activator with a UV-block clear coat that cures on the lens, and it works without a drill. I’ve done this job on everything from a 12-year-old sedan with lenses the color of weak tea to a work truck that lives outside year-round, and the pattern never changes: any decent kit looks amazing on day one, and only the coating decides whether it still looks that way next summer. Here are seven kits worth your money, sorted by how bad your lenses are and what tools you own.
As an Amazon Associate, Top10Great earns from qualifying purchases. This post contains affiliate links, which means we may receive a commission if you buy through our links, at no extra cost to you.
Best headlight restoration kit comparison at a glance
| Kit | Best for | Key spec | Price | Link |
|---|---|---|---|---|
| SYLVANIA Headlight Restoration Kit | Best Overall | Activator + clarifying compound + UV-block clear coat, no tools | $$ | Check price |
| Meguiar’s Two Step Kit (G2970) | Best Budget | Chemical cleaner + spray sealant, no sanding | $ | Check price |
| 3M Ultra Restoration Kit (39195) | Best Premium | 500/800/3000-grit drill discs + clear coat + masking tape | $$$ | Check price |
| CERAKOTE Ceramic Kit | Longest-lasting coating | Oxidation wipes + hand sanding + ceramic wipe-on coat | $$ | Check price |
| 3M Lens Restoration System (39008) | Deepest correction | Drill-driven discs + rubbing compound, no UV coat | $$ | Check price |
| Mothers NuLens Renewal Kit (07251) | Best drill kit under $20 | PowerBall 4Lights + 8 oz PowerPlastic polish | $ | Check price |
| Turtle Wax Speed Lens Restorer (53435) | Fastest fix | Restorer + ceramic acrylic protection wipes, ~10 min | $ | Check price |
1. SYLVANIA Headlight Restoration Kit — Best Overall
Sylvania’s kit is a genuine three-stage system: a surface activator that softens the dead oxidized layer, wet sanding paper plus a clarifying compound to cut it back, and a UV-block clear coat that cures in place. That last step is why I put it first — most kits finish with a wax or polish, this one finishes with something closer to what the factory sprayed on when the car was new.
What I like:
- The activator does real work — it makes heavy yellowing sand off in a couple of passes instead of ten.
- No drill required, so it’s a viable garage-floor job with nothing but the box and a spray bottle of water.
- Owners consistently report 12–24 months before haze creeps back — the top of the realistic range for any DIY kit.
Honest cons: it’s the most physical kit here — reviewers routinely mention sore arms and 45+ minutes on badly oxidized lenses. The clear coat is also unforgiving of a rushed application: pull the towel across in overlapping strokes and stop touching it, or you’ll get streaks that mean sanding it back off.
Buy it if you want the longest-lasting result you can get without power tools and you don’t mind working for it. Check the current price on Amazon →
2. Meguiar’s Two Step Kit (G2970) — Best Budget
The cheapest thing here I’d still call a real restoration rather than a cosmetic wipe. Step one is a chemical cleaner worked in with an included foam pad; step two is a spray-on sealant. No sandpaper at all, so no risk of leaving scratches you can’t polish out.
What I like:
- Under $15 in most listings and it’ll do several vehicles — good value if you’re fixing the family fleet.
- Zero sanding means it’s the safest kit for a first-timer or for lenses with a textured or stepped surface.
- Second coat of sealant goes on five minutes after the first, so the whole job fits in about 30 minutes.
Honest cons: it can’t touch deep oxidation — reviews from owners of decade-old lenses read “better, but not clear,” which is a fair description of what chemistry alone does. Meguiar’s also only claim about 12 months on the sealant, so plan on redoing it annually.
Buy it if your lenses are lightly to moderately hazed and you want the cheapest honest fix. Check the current price on Amazon →
3. 3M Ultra Headlight Restoration Kit (39195) — Best Premium
3M makes the abrasives half the detailing industry buys, and this kit treats a foggy headlight fix as a bodywork job. Three grades of drill-driven disc — 500, 800, then 3000-grit Trizact — plus masking tape, a wipe-on clear coat and a wax protectant. On lenses that are genuinely far gone, nothing else here removes as much damage.
What I like:
- The three-grit progression leaves a finish that’s optically clear, not just “less yellow.”
- Masking tape is in the box, which sounds trivial until you’ve slipped a spinning disc onto a fender.
- It’s the right answer for pitted lenses that hand kits skate over.
Honest cons: the most common complaint in reviews is a milky white haze left behind — almost always from rushing the 3000-grit step, and frustrating to fix. And the wipe-on clear coat is a lighter seal than Sylvania’s cured coating, so the deepest correction here comes with a shorter protection window unless you add a UV spray later.
Buy it if your lenses are badly yellowed, you own a drill, and you’ll take the full 45 minutes. Check the current price on Amazon →
4. CERAKOTE Ceramic Headlight Restoration Kit — Longest-lasting coating
Cerakote’s pitch is the boldest here: they guarantee the ceramic coating for as long as you own the vehicle. Three steps — oxidation-removing wipes, a small sanding kit with a foam puck, then two pre-soaked ceramic coating wipes. Most people finish both lenses in 30–50 minutes with nothing plugged in.
What I like:
- The ceramic wipe is the easiest final step of any kit here — no spray, no masking, no cure time to babysit.
- On lightly and moderately hazed lenses the results are genuinely excellent and hold up well.
- Everything is single-use and pre-measured, so there’s nothing to mix or ration.
Honest cons: complaints cluster hard at one end — heavily oxidized, decade-old lenses, where reviewers report streaking after the ceramic wipe and fog returning inside a year. The sanding step is the weak link; several people note the discs wear out before the lens texture is uniform, and a coating over incompletely corrected plastic just seals the haze in.
Buy it if you caught the haze early and want maximum protection for minimum effort. Check the current price on Amazon →
5. 3M Headlight Lens Restoration System (39008) — Deepest correction
The classic 3M kit, still one of the most-recommended headlight polish kit options on owner forums. Disc pad holder, six 500-grit gold discs, four 800-grit white discs, a Trizact refining disc and rubbing compound. It corrects as hard as the Ultra version.
What I like:
- Generous disc count — you can be aggressive without running out mid-lens.
- The rubbing compound step brings back real gloss, not just clarity.
- Widely stocked and consistently well rated, hovering around 4.5 stars across retailers.
Honest cons: there is no UV protective coating in this kit at all, which is the single biggest knock against it — you get the best correction and the fastest fade, sometimes noticeable within six to nine months. Budget for a separate UV sealant spray. It also requires a drill and a steady hand.
Buy it if you want maximum correction and you already own or plan to buy a UV protectant. Check the current price on Amazon →
6. Mothers NuLens Headlight Renewal Kit (07251) — Best drill kit under $20
Mothers takes a different route: sanding discs to knock down oxidation, then their PowerBall 4Lights foam ball chucked into a drill with 8 oz of PowerPlastic polish. The polish carries oxidation-inhibiting polymers, so there’s at least some protection at the end.
What I like:
- The PowerBall conforms to curved lenses far better than a flat disc — noticeably fewer missed edges.
- 8 oz of polish is a lot; you’ll get several vehicles out of one bottle.
- The polish doubles for taillights, gauge covers and clear trim — and it’s one of the cheapest drill kits available.
Honest cons: the polymer protection is not a UV clear coat, and reviewers report results fading faster than coated kits — often within a year. The PowerBall also slings polish everywhere if you spin the drill too fast, so keep it under about 1,400 RPM and mask generously.
Buy it if you have a drill, curvy lenses, and more than one car to do. Check the current price on Amazon →
7. Turtle Wax Speed Headlight Lens Restorer (53435) — Fastest fix
Sometimes you need the lights usable tonight, not next Saturday. This is a restorer liquid plus ceramic acrylic protection wipes — about ten minutes, no sanding.
What I like:
- Ten minutes, start to finish, on both lenses.
- The ceramic acrylic wipes add a bit more protection than a plain polish would.
- No mess, no tools, no masking — cheap enough to keep in the trunk as a pre-inspection rescue.
Honest cons: its own reviews are blunt that the fog creeps back — commonly within a few months. And on heavily yellowed lenses it barely moves the needle, because it removes very little material.
Buy it if you need a fast improvement before a night drive or an inspection. Check the current price on Amazon →
Buying guide: what actually matters in headlight restoration DIY
Every kit here will make your headlights look dramatically better on the day you use it. That’s not marketing, it’s chemistry — oxidation lives in the top layer of the polycarbonate lens, and any abrasive or solvent that removes that layer exposes clear plastic underneath. The before-and-after photo is the easiest thing in detailing to produce.
What actually separates these kits is what goes on last. Bare polycarbonate has no UV defense, so the moment polishing stops the clock starts again. A cured UV clear coat (Sylvania) or a ceramic polymer (Cerakote) buys the longest window. A wipe-on clear coat (3M Ultra) is a step down. A polish with inhibitors (Mothers) is a step below that. No coating at all (3M 39008) means you’re back where you started in under a year.
Match correction depth to damage, not to brand. Light haze needs a gentle kit and a strong coating; deep amber-yellow on a decade-old lens needs abrasive correction first, and a wipe-based product will just seal the damage in. One quick check: if the haze doesn’t change when you wipe the lens with a wet cloth, the cloudiness is inside the housing — condensation or an interior film — and no restoration kit reaches it.
Two practical notes: mask generously with real automotive tape, and if the kit calls for wet sanding, keep the surface genuinely wet. Dry sanding polycarbonate loads the paper and leaves scratches you’ll fight for twenty minutes.
Frequently asked questions
How long does headlight restoration last?
Twelve to twenty-four months for kits with a proper UV coating, and often six to nine months for kits that finish with polish or compound alone. Every coating degrades under sunlight the same way the factory hardcoat did — restoration is maintenance, not a permanent cure.
Do headlight restoration kits really work?
Yes, and the effect on visibility is measurable. AAA’s testing found that heavily degraded lenses put out roughly 22% of the light a new headlight does, and that a DIY restoration kit recovers about 70% of what was lost. That’s a real safety difference on an unlit road, not just a cosmetic one.
Do I need a drill for headlight restoration?
Not necessarily. The 3M kits and Mothers NuLens are built around a drill. Sylvania, Cerakote, Meguiar’s Two Step and Turtle Wax all work by hand. A drill mainly buys you speed and the ability to correct deeper damage.
Why do my headlights turn yellow again after restoration?
Because the protective layer you applied is wearing off under UV exposure, exactly like the original factory coating did. Re-coating with a UV protectant spray before the old layer fails — not after — is far less work than a second full restoration.
Is toothpaste a good headlight restoration hack?
It’s a mild abrasive, so it will remove a little surface haze and look impressive for about a week. It leaves the lens completely unprotected, so the oxidation returns fast. A $15 kit with a sealant is a better use of an afternoon.
The verdict
For most drivers, the SYLVANIA Headlight Restoration Kit is the best headlight restoration kit you can buy — it corrects deeply enough for real yellowing, needs no power tools, and finishes with the most durable coating in this price range. If you’re spending as little as possible, the Meguiar’s Two Step Kit is the budget pick: it won’t rescue a lens that’s gone amber, but on light to moderate haze it delivers a clean, sealed result for the price of a car wash. If your lenses are truly far gone and there’s a drill in the garage, step up to the 3M Ultra Kit and take your time on the 3000-grit pass.